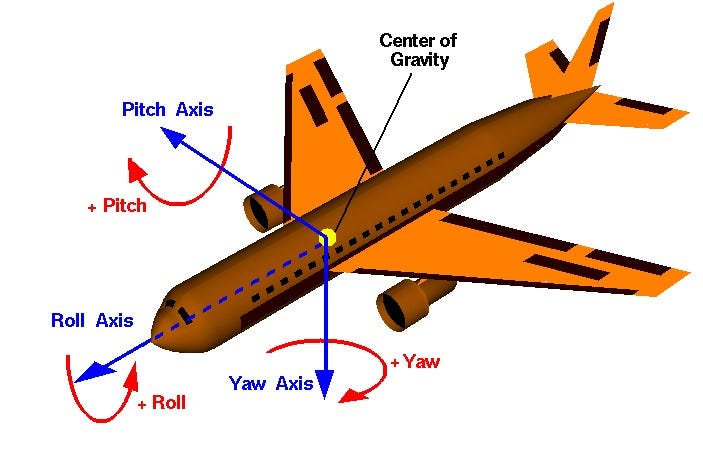
An airplane moves in three different ways, and these motions happen around three axes—imaginary lines that pass through the aircraft. Each axis controls a different type of movement: pitch, roll, and yaw. Let’s break them down!
The Three Axes
Pitch Axis (Lateral Axis):
This axis runs from wingtip to wingtip, sideways across the aircraft. When the plane moves up or down around this axis, it’s called pitching. Imagine the nose of the plane tilting up for takeoff or tilting down for landing—this is pitch. It’s mostly used to control how high or low the plane flies.
Roll Axis (Longitudinal Axis):
This axis runs from the front (nose) to the back (tail) of the plane. The motion around this axis is called rolling. This is when one wing goes up while the other goes down, making the plane tilt to one side. Pilots use roll to turn the plane left or right. It’s how planes make smooth, banking turns.
Yaw Axis (Vertical Axis):
This axis runs vertically through the center of the plane, from top to bottom. Motion around this axis is called yawing. Yaw moves the plane’s nose left or right, similar to turning a car's steering wheel. The rudder helps control the nose’s direction, but it’s not what makes the aircraft turn. Turns are primarily achieved by rolling the aircraft to one side, which creates an uneven side force from the lift. This causes the flight path to curve. Yawing keeps the plane aligned with this path, preventing extra drag and ensuring smooth maneuvering.
How They Work Together
Pilots use pitch, roll, and yaw together to guide the plane through the air, making sure it flies smoothly and stays on course. By controlling these motions, they can adjust the airplane’s position in all directions, ensuring safe and controlled flight!
Primary Flight Control Surfaces
Now we will learn how these motions are actually achieved through the use of control surfaces. These surfaces allow pilots to manipulate the aircraft’s movement in the air.
Before diving into each control surface, it's important to understand a key principle: an airfoil generates a force opposite to the direction in which air is pushed. So, when a control surface changes direction, the resulting force acts in the opposite direction of the airflow. Keeping this in mind will make it easier to understand how these surfaces work.
Ailerons
Location and Function: Ailerons are located on the trailing edges of each wing, typically positioned toward the wingtips.
Working: When a pilot moves the control stick left or right, one aileron goes up while the other goes down. The aileron that goes up reduces lift on that wing, causing it to drop, while the other wing gains lift and rises. This motion creates a rolling effect, allowing the aircraft to turn.
Elevator

Location and Function: The elevator is located on the tail of the aircraft, on the horizontal stabilizer.
Working: Both elevators move in the same direction, unlike ailerons. When the pilot pulls back on the control stick, the elevator moves up, changing the airflow to create a downward force on the tail. This causes the nose of the aircraft to pitch up. Conversely, pushing the control stick forward moves the elevator down, allowing the nose to pitch down. This helps control the aircraft's altitude.
Rudder

Location and Function: The rudder is found on the vertical stabilizer at the tail of the aircraft.
Working: When the pilot moves the rudder left or right using the foot pedals, it deflects the airflow. Moving the rudder to the left pushes the tail right, causing the nose to yaw left, and vice versa. The rudder is crucial for maintaining heading and directional control, especially during turns.
Together, ailerons, elevators, and rudders work as a team to control an aircraft's movements. Understanding how these control surfaces function helps us appreciate the skill pilots use to navigate through the skies!
Next week we will learn about some additional control surfaces that are found in most modern airplanes.


